QuickBooks Payment Gateway Modules
About QuickBooks Payment Gateway
QuickBooks Payments Gateway For WHMCS allows you to accept credit card payments on your site through QuickBooks Merchant Account. This is also the gateway module we use to accept credit card payments on our website. Clients are not redirected to a third-party website.
Requirements
1. Client Ids
2. Client Secret key
How to download the module files
1. Login with your account on our website https://my.aspiredigitalsolutions.com/clientarea.php
2. Go to My Services >> Find QuickBooks Payment Gateway Module >> Click on that service and then click on Downloads tab to download the module files as zip file.
How to upload the module files
1. Extract the downloaded zip module file.
2. Follow the directory structure and find quickbooks.php module file under (whmcsdir/modules/gateways/) folder and then upload on same path "whmcsdir/modules/gateways/)" with your WHMCS server.
3. On this path whmcsdir/modules/gateways/ you can find a callback folder. Upload this folder file on same path "whmcsdir/modules/gateways/callback/)" with your WHMCS server.
How to create QuickBooks App and required keys in your QuickBooks developer account
1. Logged in or sign up here: https://developer.intuit.com/app/developer/homepage
2. After logged in, click on Dashboard menu(on right)
3. On Dashboard page, Click on Create an App button
4. On Create app page, click on QuickBooks Online and Payments
5. On next page, fill out App name (Example WHMCS Payment gateway) and tick com.intuit.quickbooks.payment option. Click on Create App button
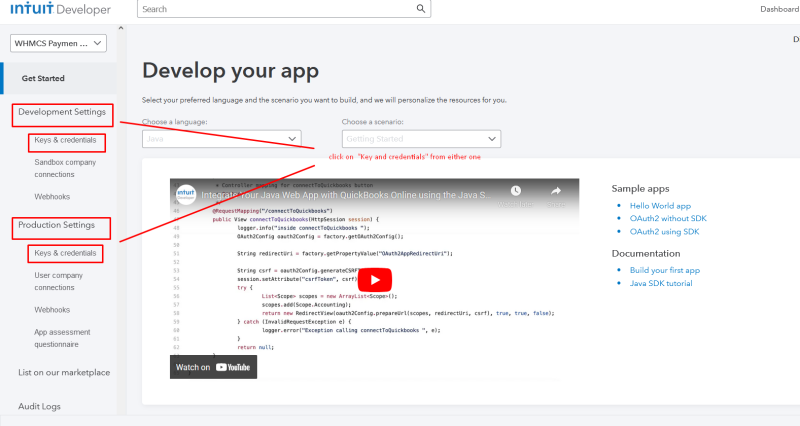
6. On the next page, click on the Keys & credentials option either from the Development Settings section or Production Settings section.
Note: Development setting is used if you want to test the payment process in sandbox(Test) mode, that is you need to fill pseudo card details.Where as product setting is used to live transaction, that is you need to fill original credit/debit card for payment during checkout.
If you select Production Settings, then you have to fill the assessment questionnaire. Once the assessment questionnaire is successfully submitted and verified, then only you will be able to proceed next.
7. Click on Keys & credentials (In production setting, you can only proceed if you have submitted an assessment and its verified by QuickBooks. In development setting you can proceed without any assessment)
8. On next page, copy the Client ID & Client Secret and keep it save on your system to configure the module as mentioned in next step.
How to configure the module with WHMCS
1.Once your services is active you will be able to download your module files as a zip folder "download.zip" that you need to unzip or extract it.
2. Upload “quickbooks Payment” folder and the “quickbooksPayment.php” file to the “WHMCS_installation_dir/modules/gateways/”
3. Log in to your WHMCS admin area. At top right side hover on "Wrench icon" and then go to System Settings >> find Payment Gateways and click on Payment Gateways box.
4. After that, you will find a button on the right-hand side with the name Visit Apps & Integrations. Click on this button and find QuickBooks.
5. When you select the QuickBooks, a popup will appear and Click on the Activate button to Activate the gateway.
6. After activation the QuickBooks gateway will appear on the payment gateways page.
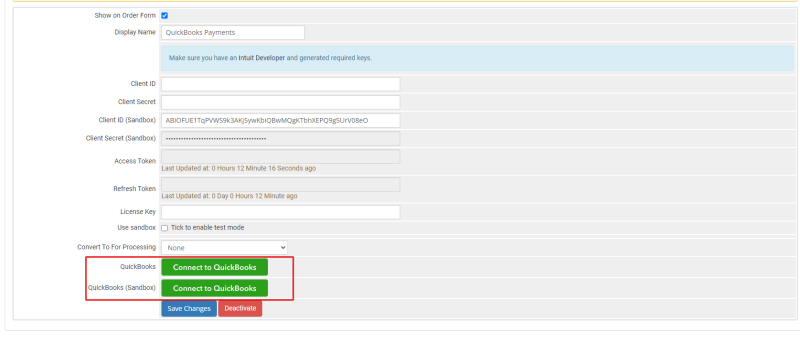
7. Now, you need to manually enter the Client ID and Client Secret (that you have created in previous step) in the input fields for both the sandbox and production environments. After entering the License Key as mentioned below, click on the two connection buttons below for establishing connections with both production and sandbox environments.
8. After clicking on the connection buttons, a popup window will open. Please select the company name and then click on the "Next" button.
9. On the next page, QuickBooks will connect with your selected company. Click on the 'Connect' button. After a successful connection, it will generate the access token and refresh token.
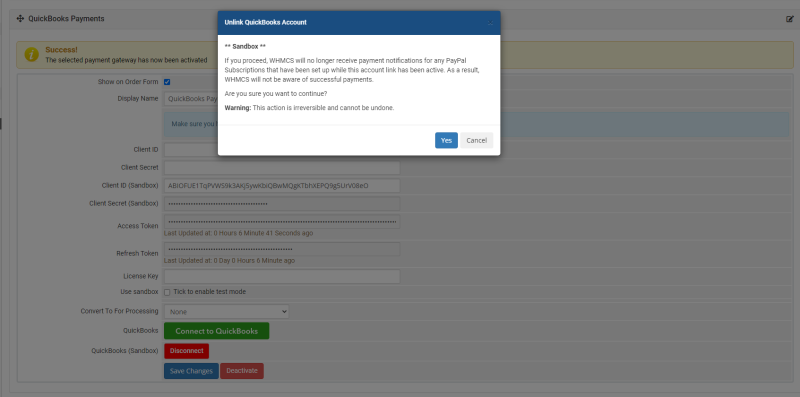
10. You can also revoke the connection by clicking on the disconnect button
APP Assessment Questionnaire for Production Setting
You must submit an assessment questionnaire to access your required keys (Client Id, Client Secret) in the production (live) environment. Your assessment will be validated by QuickBooks, and if validated successfully, only then will you be able to generate the required keys.
Logged in here https://developer.intuit.com/app/developer/homepage
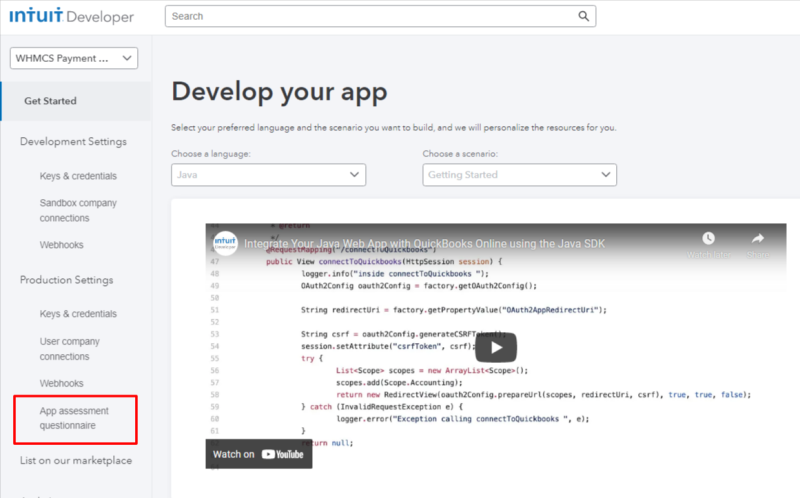
1. After logging in, click on Dashboard
2. Click on App Name
3. Click on the App assessment questionnaire.
4. On the App assessment questionnaire page, click on select relevant regulated industries.
5. On the next page, App Info Section, you can update the App name and upload a logo for the app. These fields are optional and you can leave them as they are.
6. In the next section of Terms of service links, you can put your License Agreement and Privacy Policy urls. These fields are optional.
7. In the next section of App URLs Put Hostname, Launch URL, Disconnect URL
In Host Domain you put your hostname of WHMCS installation like example.com. In Launch URL and Disconnect URL you put your WHMCS System URL like https://example.com/
8. On the next section of Categorize your app, Just tick Payment option and leave all option untick as it is.
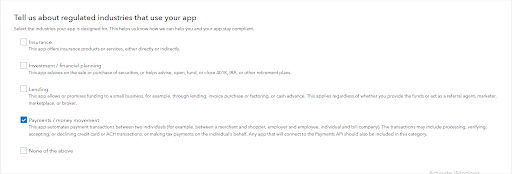
9. On the next section of Tell us about regulated industries that use your app, Tick Payments / money movement option.
10. On the next section of Where is your app hosted?, select the country of your business. You may fill IP Address of your server or you may leave it.(its optional)
11. On the next section, Countries you accept connections from, tick all options.
12. On the next section of Scope for the API, Make sure com.intuit.quickbooks.payment ( US only ) is ticked already. If not, you need to create an app again.
13. Click on Save Button
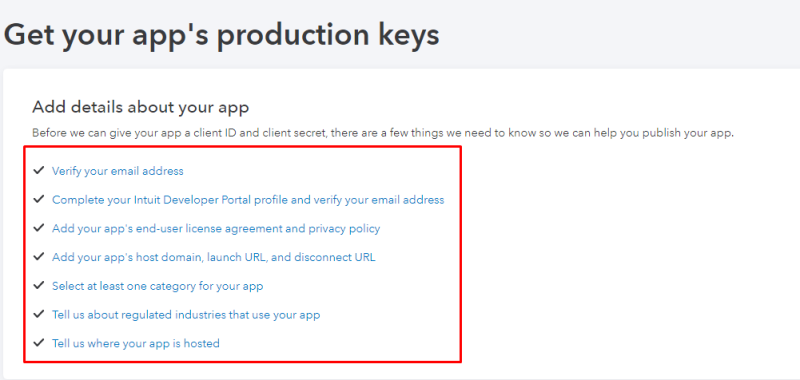
14. Now click on Keys & Credentials in Production Settings. Make sure all the options have ✓. If any option does not have this ✓ symbol then you need to click on that option and fill in the required details.
15. Now click on Go to the app assessment questionnaire.
16.On the next page of App assessment questionnaire, click on the Start questionnaire button.
17.On the next page, click on Continue questionnaire.
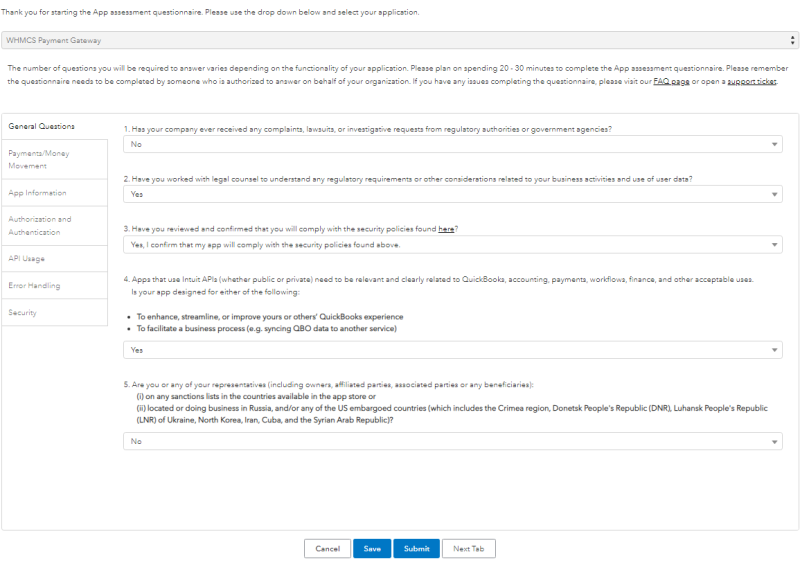
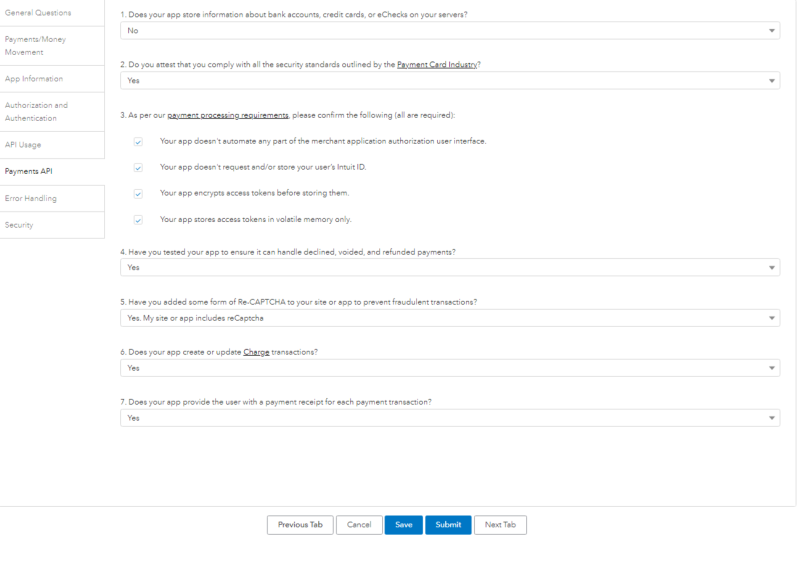
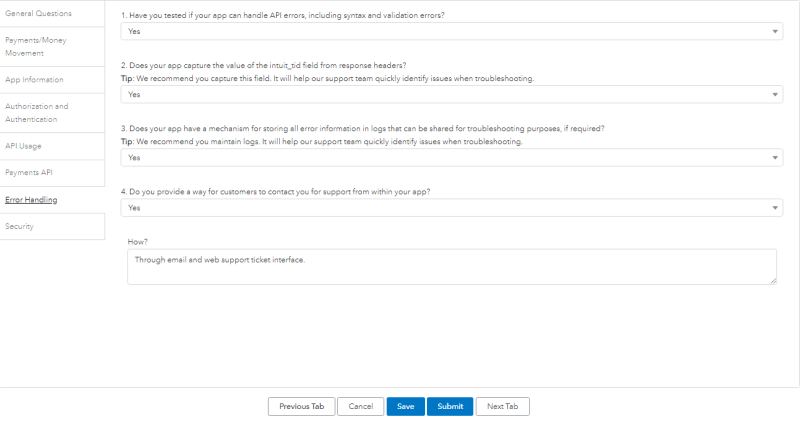
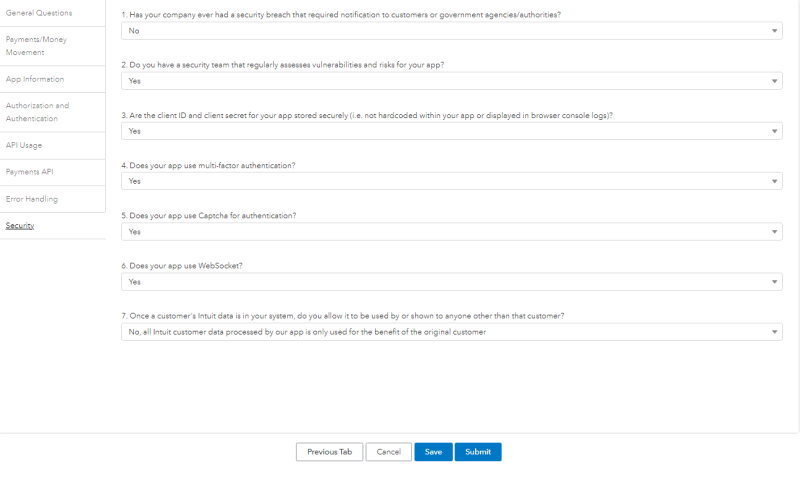
18.In the new tab, your assessment will be displayed. Select the answer as shown in the snapshot and click on Save button and then click on Next Tab button for each tab
1.General Questions Tab
2. Payments/Money Movement Tab
3. App Information Tab
4. Authorization and Authentication Tab
5. API Usage Tab
6. Payments API Tab
7. Error Handling Tab
8. Security Tab
Now click on the submit button and confirm it. After confirmation, just close the tab.
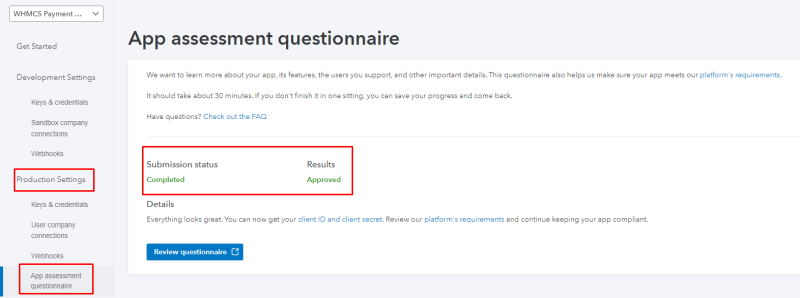
Go to the app and in the Production setting, click on the App assessment questionnaire. You can check your assessment status.
If it is Approved, then you can click on Keys & credentials link to get all required keys for the production environment.
How to test for QuickBooks Payment Gateways Module
1. You can test in both the production and sandbox environments. For the sandbox, you need to check the box labeled Tick to enable test mode in order to enable test mode for QuickBooks sandbox. Conversely, for the production environment, uncheck the test mode, as indicated below.
2. You have create a new invoice for payment or you can use any unpaid invoice for that go to client area then click on billing menu and select my invoices option after that all your invoices list will be shown and you can select any unpaid invoice.
3. After clicking on the invoice select the QuickBooks payment option and click on Paynow button
4. In the Make Payment screen you have to enter the card details for sandbox payment you have to enter testing card details.
Test Card details for sandbox
You can use random 3 digits for CVV
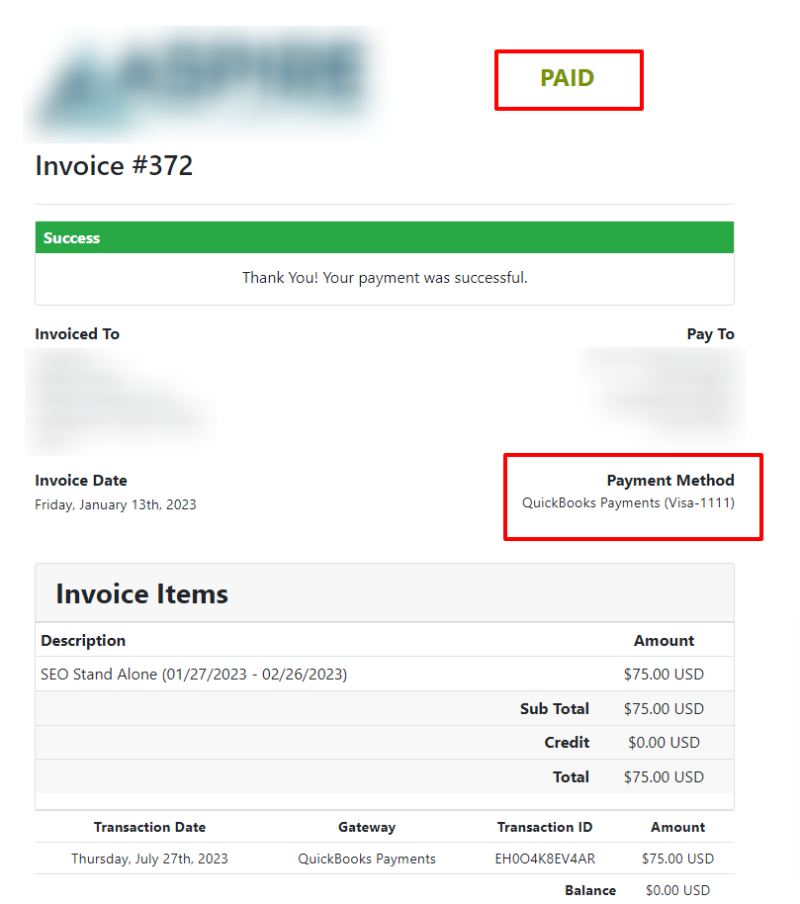
5. After clicking on Submit Payment button. The invoice will be marked a paid.
