Work History
About Work History[edit | edit source]
The Agency Deliverables Dashboard module is a vital tool for client reporting, offering transparent, detailed, and organized reports. It efficiently documents monthly deliverables across various categories like SEO, website optimization, content creation, social media strategies, and more. This user-friendly interface not only logs critical tasks but also showcases achievements. It goes beyond by allowing detailed documentation of specific links and intricate deliverable details, emphasizing the agency's efforts and showcasing tangible value
Requirements[edit | edit source]
- WHMCS V7 or V8.8.x
- WHMCS DB User must have all permissions of the DB before installation and activation of this ADDON.
How to download the files[edit | edit source]
1. Login with your account on our website https://my.agency-portal.io/
2. Go to my services or from main dashboard click on manage icon with your purchased service this module service
3. Under Downloads tab you can find the files. Download specific PHP version and Ioncube version files.
How to upload the module files[edit | edit source]
Certainly! Here's a corrected version of the provided instructions:
1. After downloading the specific PHP and IonCube version zip file, extract it on your computer.
2. Connect to FTP/SFTP and log in to cPanel, Plesk, or your preferred platform.
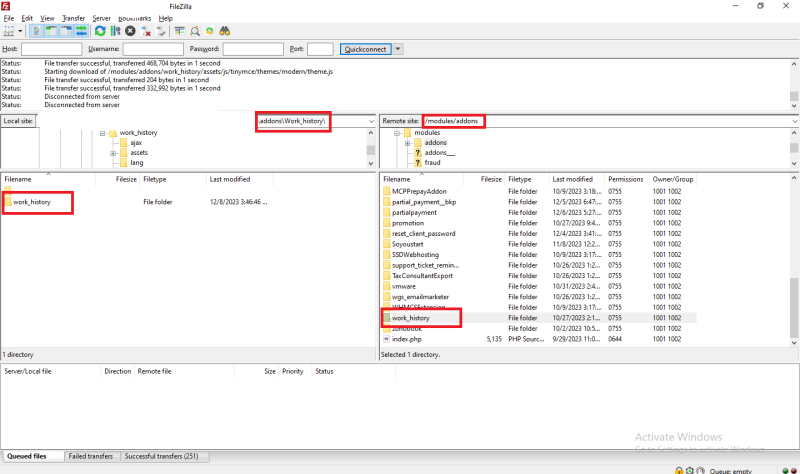
3. Within the unzipped module folder, you will find folders such as "whmcsdir/modules/addons/". Upload the "work_history" folder to your WHMCS server at the following path: "whmcsdir/modules/addons/".
Note: "whmcsdir" is the folder where your WHMCS is installed. It could be any custom folder or in the main "public_html" directory.
How to activate the addon module?[edit | edit source]
1. Login as your WHMCS admin.
2. At the top right side, hover over the "Wrench icon" and then go to System Settings >> find "Addon Modules" and click on the Add Modules box.
3. After that, you can see the list of all available addon modules. Find the “Work History” module.
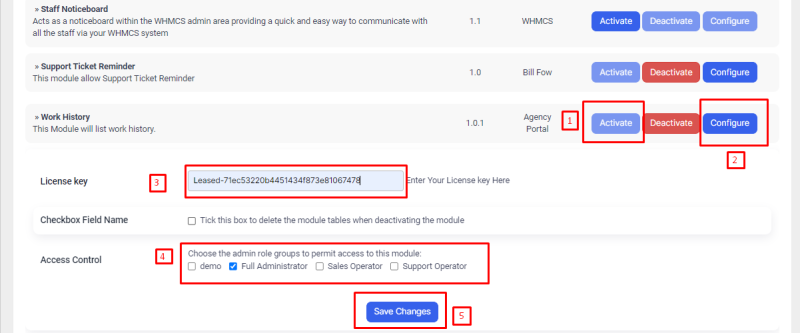
4. Click on the Activate button to activate the “Work History” Module
5.After activation, to configure it, click on the Configure Button and then add the module License key in the field provided (Login with your agency-portal account https://my.agency-portal.io/clientarea.php and with your purchased service, you can get the license key).
6. Give access rights to the admin role groups and then click on Save Changes.
Now you are ready to use the module.
How to configure the module[edit | edit source]
8. Features of Work History module
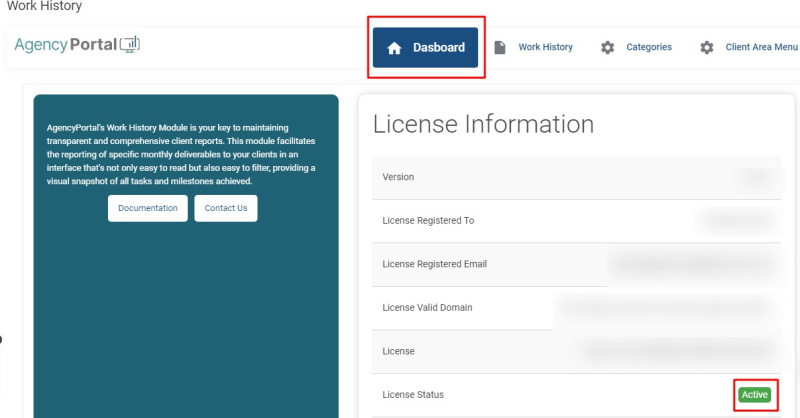
I.When we click on "Work History," we enter the module. On the dashboard, we can view our license key, license registered to, license valid domain, and license status.
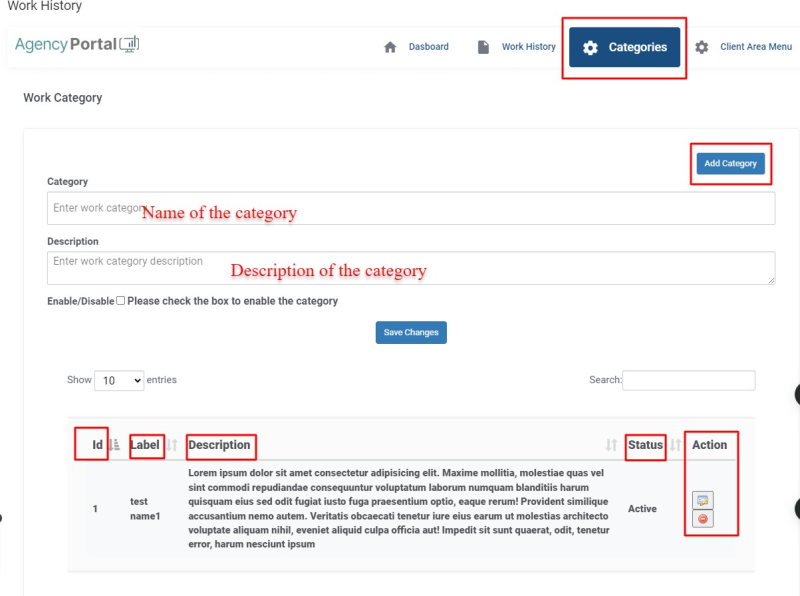
9. When we click on the "Category" tab, the Work History Category page will appear, with the following options:
I.We see the "Add Category" button. Clicking on it allows us to add a category for work history.
II.After adding the category, a table appears below, showing the category's ID, label, description, status, and action buttons such as edit and delete.
10. When we click on the "Work History" tab, the Work History page will appear, with the following options:
i.We see the "Add Work History" button. Clicking on it allows us to add work history.
ii. Work history details include the client, label, category, URL, date, and content columns.
iii.After adding work history, a table appears below showing serial numbers, client names, labels, categories, assigned dates, and action buttons like edit and delete.
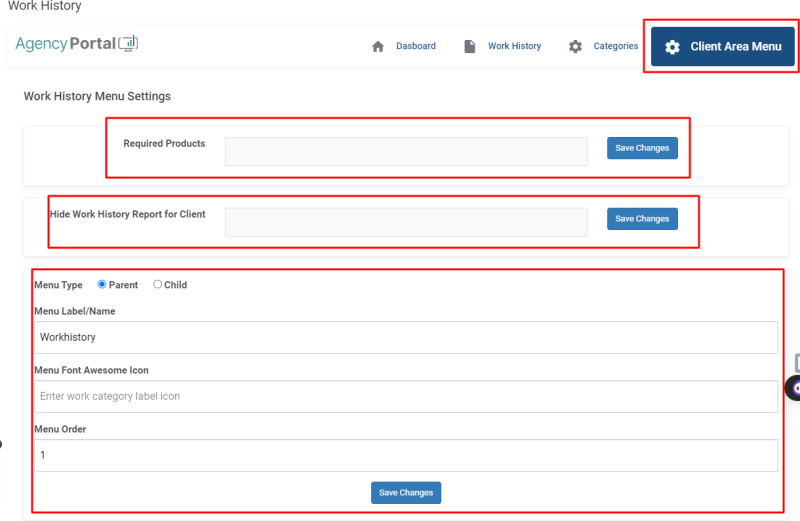
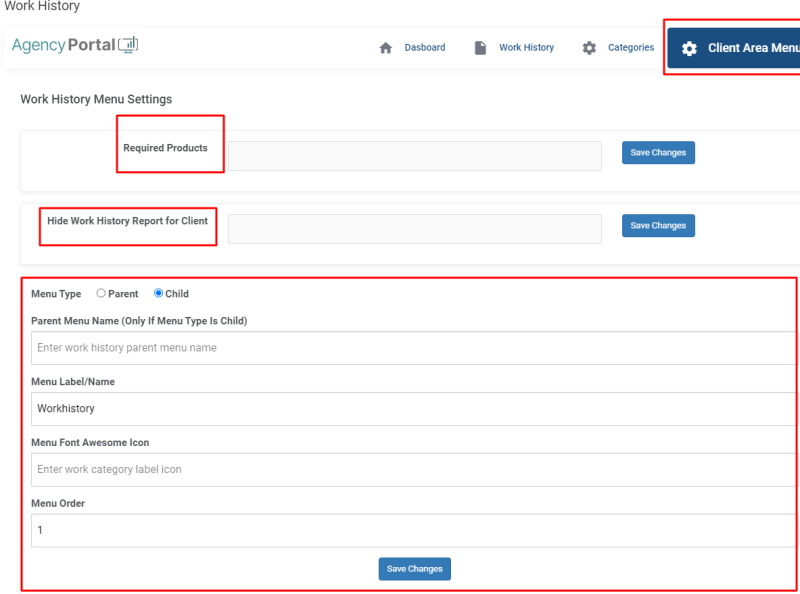
11. When we click on the "Client Area Menu" tab, the Client Area Menu page will appear, with the following options:
i. In the "Required Products" column, we can add products according to our requirements and hide work history reports from clients by selecting clients for whom we want to hide the work history report in the client area.
ii. Below this, we see columns for menu type, menu name, menu font awesome icon, and menu order.
iii. If we select the parent menu type, three columns appear: menu name, menu font awesome icon, and menu order.
If we select child menu type, then one more column will appear=> parent menu name (and this column appears only when the menu type is child), menu name, menu font awesome icon,and menu order columns.
iv.iv. If we select child menu type, an additional column appears: parent menu name (appears only when the menu type is a child), menu name, menu font awesome icon, and menu order.
