Pro Dashboard: Difference between revisions
No edit summary |
|||
| Line 8: | Line 8: | ||
'''2.''' WHMCS DB User must have all permissions of the DB before installation and activation of this ADDON. | '''2.''' WHMCS DB User must have all permissions of the DB before installation and activation of this ADDON. | ||
'''3.''' | '''3.''' Give 0777 permissions to the modules, addons, servers, gateways, and registrar directories. | ||
'''4.''' Module license key to use the module of any product for Ascent or Ascent+ Alpha. | '''4.''' GRANT ALL PRIVILEGES ON db_base.* TO db_user @'localhost' IDENTIFIED BY 'db_passwd'; | ||
'''5.''' Module license key to use the module of any product for Ascent or Ascent+ Alpha. | |||
==How to download the module files== | ==How to download the module files== | ||
Latest revision as of 07:13, 12 December 2024
About[edit | edit source]
The Pro Dashboard Module offers a streamlined interface where you can view and manage a comprehensive list of available modules. From this centralized page, you can easily install and configure each module, simplifying the setup process and enhancing your user experience.
Requirements[edit | edit source]
1. WHMCS V7 or V8.x.x
2. WHMCS DB User must have all permissions of the DB before installation and activation of this ADDON.
3. Give 0777 permissions to the modules, addons, servers, gateways, and registrar directories.
4. GRANT ALL PRIVILEGES ON db_base.* TO db_user @'localhost' IDENTIFIED BY 'db_passwd';
5. Module license key to use the module of any product for Ascent or Ascent+ Alpha.
How to download the module files[edit | edit source]
1. Login with your account on our website https://my.agency-portal.io/clientarea.php
2. Go to My Services >> Find Agency dashboard pro>> Click on that service and then click on Downloads tab to download the module files as zip file.
How to Upload the file[edit | edit source]
Certainly! Here's a corrected version of the provided instructions:
1. After downloading the specific PHP and IonCube version zip file, extract it on your computer.
2. Connect to FTP/SFTP and log in to cPanel, Plesk, or your preferred platform.
3. Within the unzipped module folder, you will find folders such as "whmcsdir/modules/addons/". Upload the "agency_dashboard_pro" folder to your WHMCS server at the following path: "whmcsdir/modules/addons/".
How to activate the addon module?[edit | edit source]
1. Login as your WHMCS admin.
2. At the top right side, hover over the "Wrench icon" and then go to System Settings >> find "Addon Modules" and click on the Add Modules box.
3. After that, you can see the list of all available addon modules. Find the “Agency dashboard pro” module.
4. Click on the Activate button to activate the “Pro dashboard” Module
5.After activation, to configure it, click on the Configure Button.
6. Give access rights to the admin role groups and then click on configure.
license key[edit | edit source]
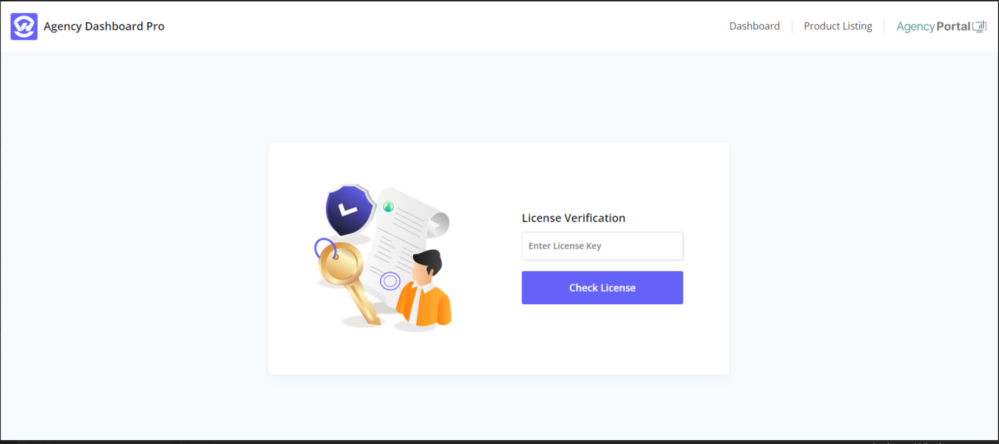
Add the module License key in the field provided (Login with your agency-portal account https://my.agency-portal.io/clientarea.php and with your purchased service, you can get the license key).
Now you are ready to use the module.
How does module work[edit | edit source]
1. After successfully verifying the license, you can view the dashboard, which provides information about your Pro Dashboard module license.
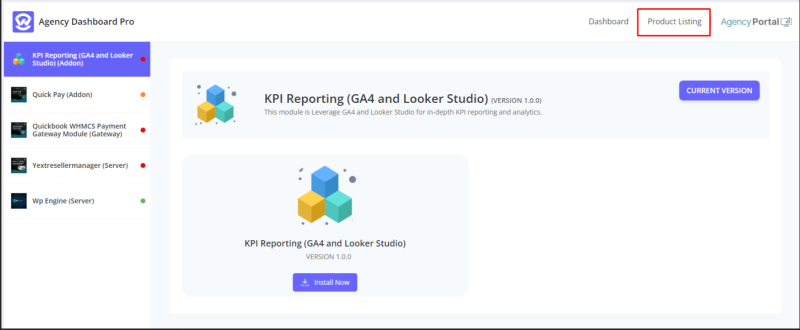
2. To view the list of modules, you need to click on 'Product Listing' in the navigation bar
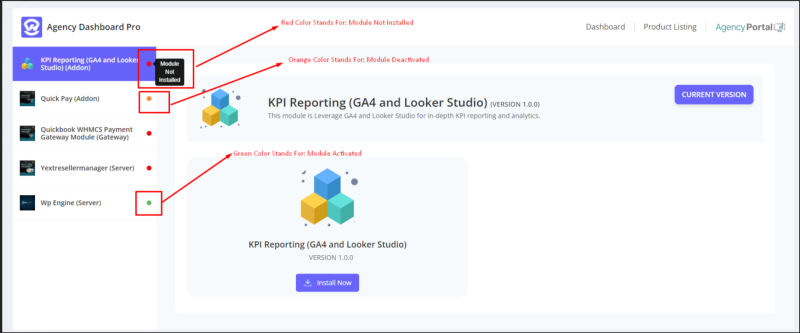
3. In the Product Listing, you will see a list of modules in the left sidebar that you have installed and configured on a single page.
-> Here, the color of the dots indicates the following:
A.) Red indicates the module is not installed
B.) Orange indicates the module is deactivated
C.) Green indicates the module is activated
4. From the list of your modules, you can simply install a module by clicking on 'Install Now.'
5. After successfully installing the module, you can see the module description and feature list.
6. To configure and activate your module, you need to click on the 'Next' button.
7. After successfully installing the server module, you can see the description and feature list.
a.) you can click on the 'Next' button and create the product group.
b.) You can click on the 'Create a New Product' tab; the server module is already attached for creating the product.
c.) By clicking on the 'Products/Services List,' you can see a list of all products.


