Keyword Rank Tracker: Difference between revisions
No edit summary |
No edit summary |
||
| (4 intermediate revisions by the same user not shown) | |||
| Line 20: | Line 20: | ||
[[File: | [[File:Keywords-addon-setting.png|1000x1000px]] | ||
==How to configure the module?== | ==How to configure the module?== | ||
| Line 43: | Line 43: | ||
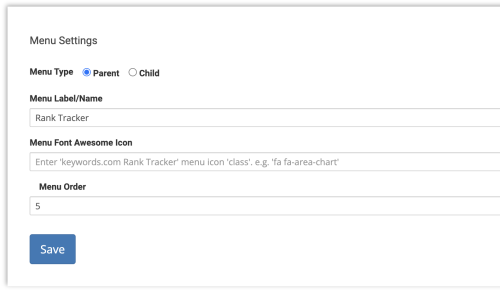
[[File:Add-parent-menu-keyword.png|center|500px]] | [[File:Add-parent-menu-keyword.png|center|500px]] | ||
This setting will add a parent menu to the user account. This setting works in conjunction with the LocalViking | This setting will add a parent menu to the user account. This setting works in conjunction with the LocalViking, Work History, and Google Analytics addons. The menu can be added as a child menu under the parent menu (if created in the LocalViking addon setting). | ||
The parent menu can be created either in the LocalViking addon or in the Keyword Rank Tracker addon. The below possible settings can be done: | The parent menu can be created either in the LocalViking addon or in the Keyword Rank Tracker addon. The below possible settings can be done: | ||
| Line 52: | Line 52: | ||
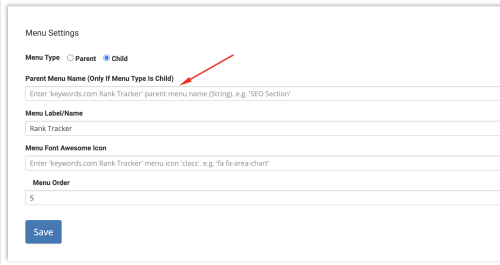
[[File:Add-as-child-menu.png|center|500px]] | [[File:Add-as-child-menu.png|center|500px]] | ||
In case of adding as child menu, the parent menu must be created in the LocalViking addon settings. If parent menu label doesn't match, a parent menu will be created and then child menu will be added. | In case of adding as child menu, the parent menu must be created in the LocalViking/Work History/Google Analytics addon settings. If parent menu label doesn't match, a parent menu will be created and then child menu will be added. | ||
==Configure User Account== | |||
This module can be integrated in two ways: | |||
# Get the iframe embed code from the Keyword.com account and add to the user account (select the required product as selected in the addon settings). | |||
# Add keywords in the user account, which will be shown in the user account. These keywords will be added to the keyword.com account. | |||
[[File:Keyword-rank-tracker-client-settings.png|center|900px]] | |||
==User Account== | ==User Account== | ||
[[File:Rank-tracker-frontend.png|center|900px]] | [[File:Rank-tracker-frontend.png|center|900px]] | ||
Latest revision as of 13:08, 4 October 2023
About Keyword Rank Tracker[edit | edit source]
Monitor keyword performance quickly and accurately with Keyword.com. Track rankings for your SEO campaigns daily from any location and device.
Requirements[edit | edit source]
1. KeyWord.com SERP API Master Key
2. License key provided with the addon purchase
How to upload the module files?[edit | edit source]
1. Download the zip file and extract it under whmcs_installation_dir/modules/addons.
2. Now login to the WHMCS Admin panel and navigate to Configuration > System Settings > Addon Modules or, prior to WHMCS 8.0, Setup > Addon Modules, and the addon will be listed.
3. Click on Activate, under the Keyword Rank Tracker addon. The addon is now activated within your WHMCS Panel.
4. Now Enter your KeyWord.com API Master Key and License Key and tick on Administrator then click on Save Changes button. Now, this module is ready to use.
How to configure the module?[edit | edit source]
Addon Module
1. Login to the admin area.
2. Click on Addon > Keyword Rank Tracker
3. Enter required details:
- Select the required product for the users who can access this module in their account.
- Select users if specifically need to hide this module for any user.
- Manage the menu in the user account.
This setting will add a parent menu to the user account. This setting works in conjunction with the LocalViking, Work History, and Google Analytics addons. The menu can be added as a child menu under the parent menu (if created in the LocalViking addon setting).
The parent menu can be created either in the LocalViking addon or in the Keyword Rank Tracker addon. The below possible settings can be done:
- Add both settings as a parent menu.
- Add parent menu from either addon.
- Child menu from either (there must be one set as parent menu, and parent labels must be the same).
In case of adding as child menu, the parent menu must be created in the LocalViking/Work History/Google Analytics addon settings. If parent menu label doesn't match, a parent menu will be created and then child menu will be added.
Configure User Account[edit | edit source]
This module can be integrated in two ways:
- Get the iframe embed code from the Keyword.com account and add to the user account (select the required product as selected in the addon settings).
- Add keywords in the user account, which will be shown in the user account. These keywords will be added to the keyword.com account.


